Tuesday, 25 January 2011
Tuesday, 4 January 2011
My Works!
My Sewing Art!
I did this when I was 10 with my mum (she is very creative.) These two arts are sewing arts and if you would like to know how to make these kinds of arts in this site there are some links which they go to different sites which actually tell you how to make some sewing arts and it has some techniques where it has different ways of making different patterns and it does it in simple ways for you and it has videos for you to watch of how to make it!
 |
| Sewing Art: Pink Love Heart! |
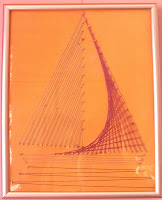
The same link that you went on for that heart Sewing Art at the same site click on the "Printable sheets" and then if you find the picture of a yacht click on that then you print that out when you have you don't have any numbers on it like the heart one but the is some places for nails so you did what you done for the heart which is to place the print sheet(s) on a piece of thick card and nail the nails onto them there is only 16 nails required for this. If you look at the animations on this site it will tell you how to the sail that is at the right side of the boat which is like an "L" it tells you how to join it up that is how you do it if you do not know then just to tell you that you start at the left side of the bottom of the "L" backwards then you join that one with the second last point on the other side of the "L" backwards and then go back to the bottom of it but to the second point then join that onto the third last point etc. Then after you have t do the left sail which is basically you start at the corner left point of the bottom of the left sail and then join it to the top of the sail then to the
second pint at the bottom then to the second one etc.
Once you have finished the sail you start the base of the boat. You start at the top right point then join to the left top point then to the second right point then the second left point etc. When you finished the boat completely you start the river which is basically you start st the left top point then the right top point then the second left point then the second right point etc. Then when you are finished you should have a Sewing Art Picture like me! I hope you enjoy making it!
Once you have finished the sail you start the base of the boat. You start at the top right point then join to the left top point then to the second right point then the second left point etc. When you finished the boat completely you start the river which is basically you start st the left top point then the right top point then the second left point then the second right point etc. Then when you are finished you should have a Sewing Art Picture like me! I hope you enjoy making it!
| This is a bookmark that I sewed! |
 |
| I made this Ladybird at school in Year 2. |
I made this ladybird in Year 2 when we were learning about insects then we had a ART lesson when we had to choose an insect to do for the Topic "Insects" the three insects we could choose out of was Ladybird, Caterpillar, Butterfly, Dragonfly etc. I chose the Ladybird because I liked the Ladybird the most. We first had to design our picture before we made it then we had to choose all the material for it. Then I made it and I did it symmetrical 4 black spots on each side and I did it on a maple leaf then I put glitter over the Ladybird to make it shiny. Then I was finally finished. Then at home I put a rainbow because I didn't have time at School.
 |
| I made this picture with Mosaic Art ! |
I did this with Mosaic Art in this site I will put other patterns of this.

Monday, 3 January 2011
Silhouette painting.
Silhouette.
This is a silhouette. I like this silhouette is like a shelter for the summer from the sun. I made this painting in Year 5 at the end of the year it was a school art project and I used this picture for it and a lot of people wanted it but they couldn't because only the owner of the painting could have it.
 |
| My Silhouette! |
I will tell you how to make a silhouette like this one firstly you have get a picture of a silhouette and then draw the outline onto card after when you are happy with the drawing you need to colour the inside with a thick black pencil and make sure that there are no white marks in the picureand make sure that it can fit in an A4 paper. Next you have to get a A4 paper and you have to paint a sunset with water colours I used purple, pink and orange, but you can choose different colours if you prefer. When the painting is dry you get the silhouette that you cut out and stick it (it is better with PVA glue) on the A4 paper when it is definately stick on and it can't fall off you add a layer of PVA glue over the painting to make it shiny and then leave it to dry when it is dry you finally have a very shiny and realistic sihouette.
I hope you like your silhouette painting!
Subscribe to:
Comments (Atom)


